Extractor Fan Grease Removal: The Kitchen Task Most Tenants Miss Completely
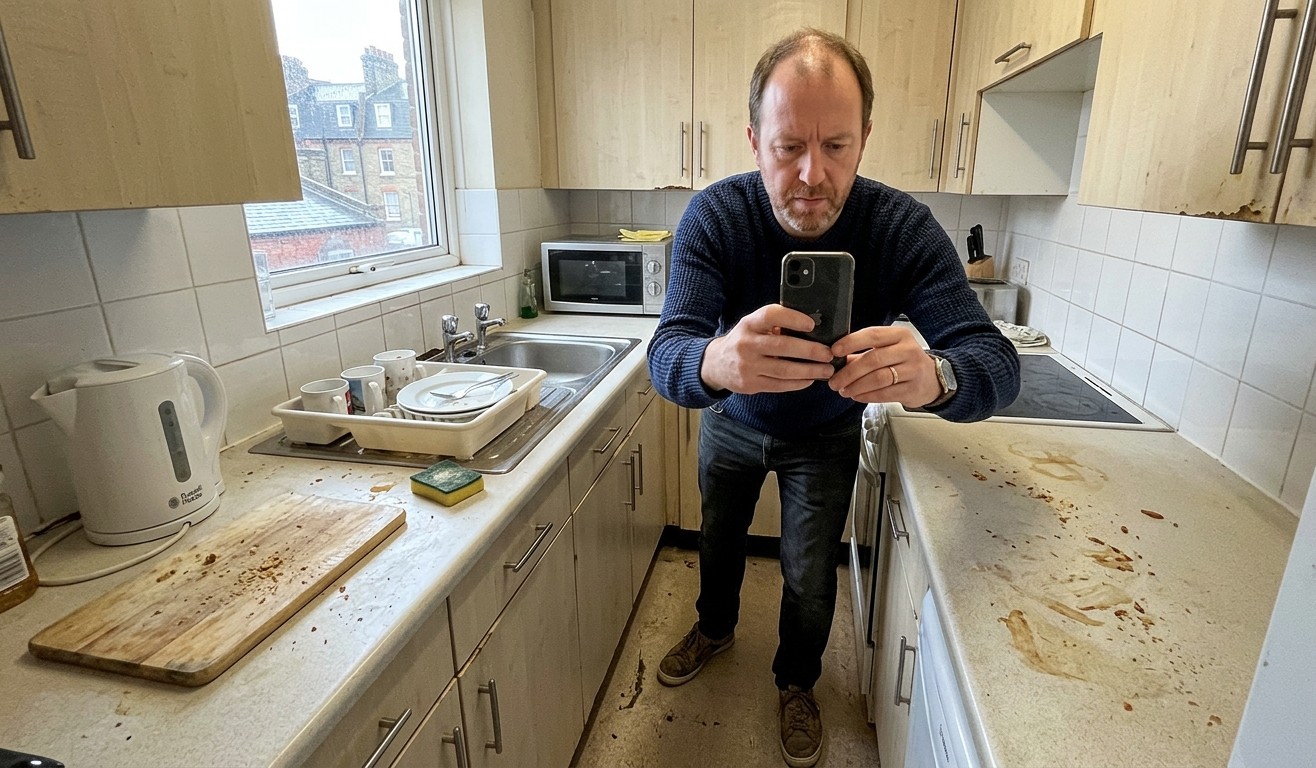
Picture the scene. It’s moving-out day. You’ve been at it since seven in the morning, armed with rubber gloves, a mop, and the kind of grim determination usually reserved for tax returns. The oven has been scrubbed within an inch of its life. The bathroom tiles are practically luminous. You’ve even cleaned behind the washing machine, which frankly deserves its own certificate. You hand back the keys feeling quietly confident that your deposit is safe.
Two weeks later, a letter arrives. The landlord is deducting £85 for “professional cleaning of extractor fan and filters.” You stare at it, baffled. You cleaned everything. Didn’t you?
Here’s the thing – most tenants do clean everything they can see. The extractor fan, perched above the hob and largely ignored throughout the tenancy, simply doesn’t register as a cleaning priority. It’s the kitchen task that falls through the cracks almost universally, and it costs London tenants real money, year after year.
What’s Actually Living Inside Your Extractor Fan
Grease, Dust, and a Low-Key Fire Hazard
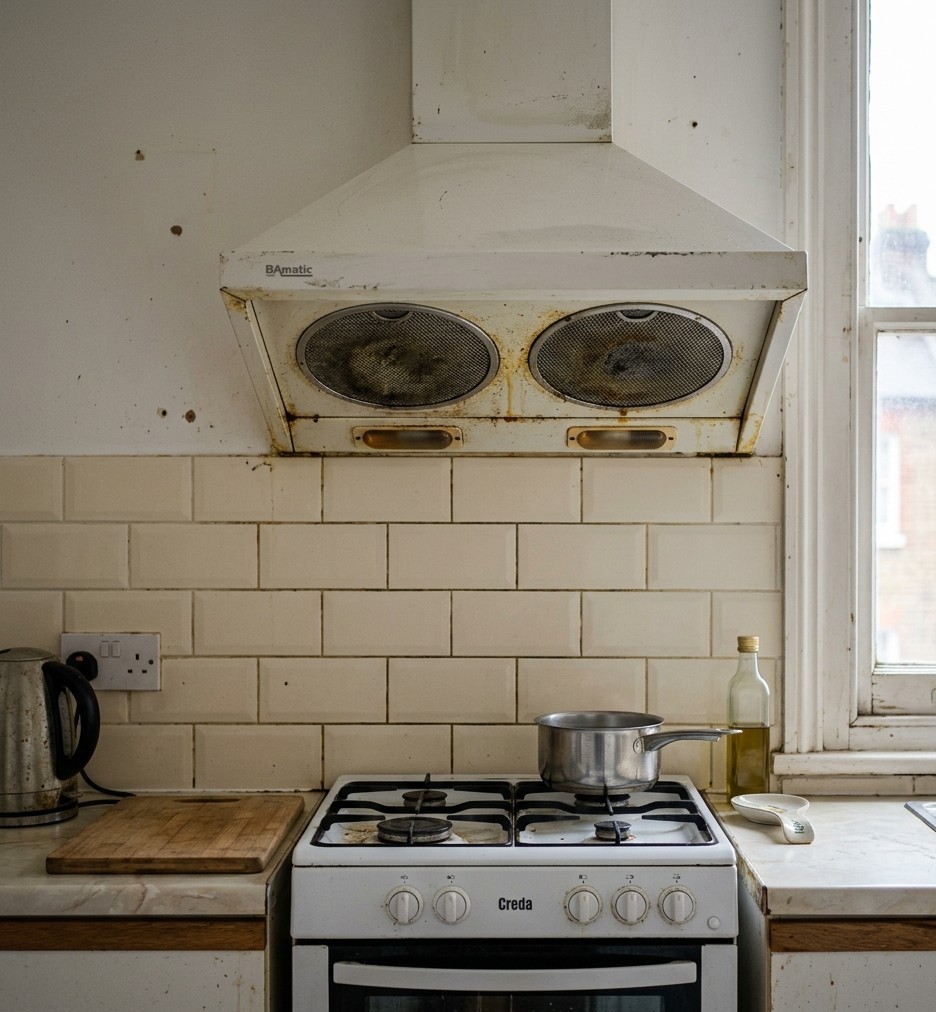
Let’s talk about what’s actually going on inside that innocuous-looking box above your hob, because it’s considerably grimmer than the exterior suggests.
Every time you cook – whether it’s a Sunday roast, a stir-fry, or the kind of fry-up that requires a sit-down afterwards – airborne grease particles, steam, and smoke get drawn up into the extractor fan. The fan’s job is to pull all of that out of your kitchen. The catch is that a good deal of it never makes it all the way out. Instead, it settles on the filters, the internal housing, and the fan blades themselves, baking on slowly over months and years, building up layer by sticky layer.
What you end up with is a combination of polymerised cooking grease – essentially grease that has hardened through repeated heating – accumulated dust bonded to that grease, and in some cases a genuinely unpleasant situation involving mould, particularly in kitchens with poor ventilation. The grille on the outside might look a bit dusty and manageable, but the interior tells an entirely different story.
There’s also a safety angle worth flagging. Heavily clogged extractor fans are a recognised fire risk. Grease is, at its core, a fuel source, and a fan caked in the stuff running warm is not something to be casual about. It’s precisely why commercial kitchen extractors carry strict legal cleaning schedules. Domestic fans don’t carry the same legal weight, but the physics are identical.
So when a landlord flags the extractor fan at check-out, it isn’t pedantry. There is genuine, demonstrable grime in there – and it will have been building throughout your tenancy.
Why Extractor Fan Cleaning Falls Off Every Move-Out List
The Psychology of the Job Nobody Sees
There’s a very human reason why extractor fans escape the move-out clean almost every time, and it has nothing to do with laziness. It’s about visibility.
We clean what we see. More specifically, we clean what we imagine other people will see. The hob gets a thorough going-over because it’s right there, at eye level, obviously used and obviously dirty. The bathroom gets attention because we know it’s scrutinised. Even the inside of the fridge tends to get a wipe because we understand it holds food and odours.
The extractor fan sits above all of this – literally and figuratively. It’s overhead, it doesn’t look dramatically dirty from below (the grease is inside, remember), and it operates on a sort of ambient understanding that it’s just there, doing its job quietly. It’s the kitchen equivalent of the boiler cupboard: functional infrastructure that only enters your consciousness when something goes wrong.
There’s also the fact that most tenancy agreements address extractor fan cleaning in vague, catch-all language – something along the lines of “all kitchen appliances and fixtures to be left in a clean condition.” Tenants read that, wipe the microwave, and consider the matter settled. Nobody specifically tells you at the start of a tenancy that the extractor fan filters need degreasing periodically and will be inspected closely at check-out. If they did, this would be a considerably shorter article.
The result is a consistent, predictable blind spot – one that inventory clerks across London have been flagging, quite legitimately, for years.
What Happens at Check-Out When It Hasn’t Been Done
The Deposit Deduction You Genuinely Didn’t Expect
Check-out inventory reports in London follow fairly standardised formats, and extractor fan condition is a routine line item. Clerks are trained to inspect it, they know exactly what a properly cleaned fan looks and feels like, and they have no difficulty identifying one that hasn’t been touched.
Photographs are taken. Notes are made. A quote from a professional cleaning company is obtained – because once grease has had the chance to polymerise over a full tenancy, it usually takes professional-grade chemistry to shift it properly.
In London, the cost of a professional extractor fan clean charged back via deposit deduction typically sits between £60 and £120, depending on the unit type and the scale of neglect. That’s not a ruinous sum in isolation, but it lands alongside other deductions with a particular sting, because it feels so entirely avoidable.
Deposit disputes involving extractor fans are also notably easy for landlords to win. Unlike a subjective disagreement over whether a wall scuff counts as fair wear and tear, a greasy filter is a greasy filter. It photographs well, it’s clearly covered under general cleanliness obligations in most tenancy agreements, and it’s very difficult to argue against.
Adjudication bodies see cases like this regularly. The tenant argues they cleaned thoroughly. The landlord presents a photograph of the filter. The adjudicator sides with the landlord. It is, unfortunately, that straightforward.
How to Clean an Extractor Fan Properly Before You Leave
Degrease, Dismantle, Soak, Repeat – Here’s the Process
Knowing something needs doing and knowing how to do it are two different things, so let’s get into the actual mechanics.
Switch off and isolate the unit first. Turn the fan off, and if you can access the fuse for it, isolate it there too. You’re working near an electrical appliance with water and cleaning products, so caution is non-negotiable.
Remove the filters. Most domestic extractor fans have either mesh filters or baffle filters – the kind with interlocking metal slats that look like a miniature venetian blind. Both types are designed to be removed, usually by sliding, unclipping, or twisting, depending on the model. Consult the manufacturer’s guidance if in doubt.
Soak the filters. Fill the sink with the hottest water you can manage and add a generous measure of a good alkaline degreaser – something designed specifically for kitchen grease rather than a general-purpose cleaner. Leave the filters to soak for at least 30 minutes. For heavily soiled filters, an hour is better. The water will turn an unappetising shade of yellow-brown. That is entirely normal and means it’s working.
Scrub, rinse, and repeat if necessary. Use a stiff-bristled brush to work the degreaser into the mesh or baffle surfaces, rinse thoroughly under hot running water, and repeat the soak if the result still looks greasy.
Clean the housing interior. With the filters out, spray the interior surfaces with degreaser, allow it to dwell for five to ten minutes, then wipe down thoroughly with a microfibre cloth. Pay particular attention to the area directly around where the filters sit.
Wipe down the exterior. A degreaser-dampened cloth on the outer grille and the surrounding wall area, and you’re done.
One thing to avoid: the temptation to run the filters through a dishwasher on a standard cycle and call it done. For very light soiling it can help, but for anything beyond a couple of months of modest cooking, it won’t produce a result that satisfies a professional inspection.
When the Grease Has Gone Too Far for a DIY Fix
Some Battles Are Better Left to the Professionals
There is a point at which extractor fan grease stops being a DIY problem and requires honest acknowledgement that professional intervention is the more sensible route.
If the tenancy has run for several years and the fan hasn’t been cleaned once during that time, the grease will likely have polymerised beyond what standard household degreasers can fully shift, even with extended soaking. The same applies if you’ve inherited a fan that a previous tenant also neglected – a scenario that’s remarkably common in London rental properties, where cleaning standards between tenancies vary wildly.
Professional end of tenancy cleaners work with commercial-grade alkaline degreasers at significantly higher concentrations than anything available off the shelf. Dwell times are extended. Fan blade assemblies that aren’t accessible without partial disassembly of the unit get attention that most tenants simply can’t replicate at home.
There’s also the practical matter of evidence. A professional clean comes with a receipt and, in most cases, a detailed cleaning checklist – documentation that is directly useful should a deposit dispute arise and you need to demonstrate the task was completed to a professional standard.
The Extractor Fan Test – Your Move-Out Readiness Check
One Last Look Before You Hand Back the Keys
Before you consider the kitchen finished, run through this quick check. Remove the filters – do they come away clean and grease-free? Look up into the housing interior – are the surfaces wiped down, with no visible deposits or discolouration? Check the visible fan blades – no grease build-up? Wipe the exterior grille and the surrounding wall – clean to the touch?
If you can answer yes to all of the above, your extractor fan will not be appearing on your check-out report. That’s the standard – clearly defined, entirely achievable, and unfortunately one that the majority of tenants discover only after it has already cost them part of their deposit.